

Terrazzo Epoxy Kit
Terrazzo Epoxy Kit
Couldn't load pickup availability

PRODUCT DESCRIPTION
GROUND SHIPPING ONLY
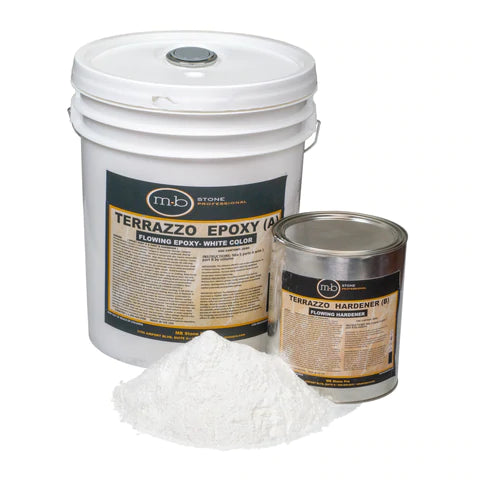
Terrazzo Epoxy Kit comes standard in White ** FOR PROFESSIONAL USE ONLY **
Available in 1 Gallon or 6 Gallon sizes.
1 Gallon Kit includes 102 oz Part A, 26 oz Part B along with 6 pounds of marble dust
6 Gallon Kit includes 5 gal Part A, 1 gal Part B along with 36 pounds of marble dust
ADDITIONAL ITEMS NEEDED:
For color matching you will need the Bonstone Tint Kit found here.
Aggregate information can be found here
Basic Terrazzo Repairs
APPLICATION:This adhesive will NOT cure at low temperatures, at or below freezing. Terrazzo Epoxy should be stored at room temperature before dispensing.
SURFACE PREPARATION: This surface must be clean and dry. Remove dust, laitance, grease, curing compounds, waxes, foreign particles, disintegrated or soft base material and any previously applied potentially incompatible coatings.
Coverage is approximately 6 to 7 sf per gallon at ½ inch depth. For larger jobs please contact us for available options.
If matching any color other than white, you will need the Bonstone Liquid Tints to match the desired color of the matrix. You will need to achieve the desired color match before adding any aggregate or hardener.
For the aggregate, you will choose the aggregate to attain the appropriate match
Step 1) Now that you have your color match you are ready to add the hardener. The hardener is added using a ratio of 5 parts color matched epoxy A to 1 part hardener B. The hardener allows for a long working time, approximately
Step 2) Mix 30 to 35 lbs of chosen aggregate for each gallon of color matched epoxy. NOTE: blend the aggregate based on the percentage of aggregate you see in your samples.
Step 3) Mix 4 to 5 pounds of the marble dust for each gallon of epoxy. The desired consistency should be that of peanut butter. You can use up to 6 pounds per gallon of epoxy of the marble dust if needed to get that consistency.
Step 4) You are not ready to trowel into repair area. The mix will harden overnight and will be ready for the first grinding cut the next day.
Step 5) After first cut, continue the process up to 120 grit of abrasives. At this point you will need to do a grouting application to fill pinholes or voids created from grinding. Using left over or additional epoxy mix and marble dust to make your grout. Again, using the 5 to 1 ratio of epoxy A to hardener B to mix grout. Pour this mix over area, then broadcast a couple handfuls of the marble dust over mix. Trowel this mixture, pushing the grout into the pinholes. You want to remove as much of the grout mixture as possible during this process leaving it only in the voids or holes. Be careful not to leave a lot on the surface as it will hardened and require more steps to remove.
Step 6) Continue with the honing process through the next grits of abrasive to achieve the desired finish.

